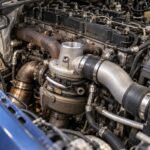
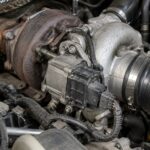
Knowing How to Install a Turbocharger correctly is the difference between a unit that lasts 300,000 miles and one that grenades itself in the first 20 minutes of runtime. Most premature turbo failures we see at PT Turbo aren’t manufacturing defects. They’re installation mistakes: skipped oil priming, reused gaskets, debris left in the intake, or an actuator that was never set up right. This guide walks you through the entire job the way a seasoned diesel tech does it, from prep to first startup.
PT Turbo has been rebuilding and supplying turbochargers since 1978, so this is field-tested procedure, not theory. Follow it and your install will hold.
Before You Start: Diagnosis and Parts Prep
Don’t pull a turbo until you’ve confirmed it’s actually the problem. Blue smoke, loss of boost, whining, oil in the intercooler piping, or a check-engine code for boost pressure deviation all point to the turbo, but so do a clogged air filter, a leaking boost pipe, or a failed EGR system. Rule those out first.
A turbocharger is a precision component spinning at well over 100,000 RPM on a film of oil. The basics of how that works are covered well in this turbocharger overview, but the practical takeaway is simple: cleanliness and oil supply are everything.
Gather your parts before the truck goes up on the lift. You’ll want:
- The replacement turbocharger (new or remanufactured)
- New oil feed and drain gaskets, plus a new oil feed line if the old one is coked
- New exhaust manifold and downpipe gaskets
- Fresh engine oil and a new oil filter
- Anti-seize for exhaust studs and high-temp thread sealant where specified
- A replacement actuator if yours is worn or sticking
If you’re replacing the whole unit, our remanufactured turbochargers are built to OEM spec and balanced on VSR machines, which is why they cost significantly less than new without sacrificing reliability.
New vs. Remanufactured vs. Rebuild: Choosing Your Path
Before installation you need to decide what’s going back on the engine. Here’s how the three common options stack up for a typical medium-duty diesel application.
| Option | Typical Cost | Lead Time | Best For |
|---|---|---|---|
| New OEM turbo | $442 to $13,412 (1904 listings) | In stock to weeks | Warranty-critical fleet units |
| Remanufactured turbo | $525 to $8,461 (259 listings) | Usually in stock | Best value for most owner-operators |
| Rebuild your core | $450 to $975 for most turbos at PT Turbo (price list) | 3 to 5 business days after inspection | Rare or hard-to-source units |
Price ranges in this article are general estimates to help with budgeting, not PT Turbo quotes. Our current prices are on each product listing, and our rebuild prices are on the turbo rebuild price list.
If your original unit has a good housing and shaft, our turbocharger rebuild service can restore it for a fraction of new-unit cost. We stock both new and remanufactured parts, so you’re never forced into the expensive option just to get a truck back on the road.
Step-by-Step: How to Install a Turbocharger
Set aside 3 to 6 hours depending on engine access. On tight engine bays, budget more. Work cold, never on a hot exhaust.
Step 1: Disconnect and Remove the Old Unit
Disconnect the battery. Remove the intake ducting, charge-air piping, and heat shields. Cap every open port immediately with clean rags or plugs so nothing falls into the intake or exhaust.
Disconnect the oil feed line, oil drain, and any coolant lines on water-cooled units. Then remove the actuator vacuum or boost line and any electronic sensor connectors before unbolting the turbo from the manifold or downpipe.
Step 2: Clean Everything
This is the step careless installers skip, and it’s the one that kills new turbos. Inspect the charge-air cooler and all piping for oil pooling. If the old turbo failed and shed oil or metal, flush the intercooler and pipes completely. A single chunk of debris can destroy a new compressor wheel in seconds.
Scrape old gasket material off the manifold and downpipe flanges until they’re clean and flat. Check the mounting studs for stretch or thread damage and replace any that look questionable.
Step 3: Prime the New Turbo With Oil
Before bolting anything up, pour clean engine oil into the oil feed port of the new turbo and spin the shaft by hand to coat the bearings. This pre-lubrication prevents a dry start, which is the number one cause of infant turbo failure.
Do not use assembly lube in the center housing. Clean engine oil only, the same grade going into the crankcase.
Step 4: Mount the Turbo
Fit new gaskets, never reuse old ones. Set the turbo onto the manifold and hand-thread all fasteners before torquing anything. Apply anti-seize to exhaust threads to make the next removal possible.
Torque the mounting nuts in a cross pattern to the manufacturer’s spec, typically 25 to 35 ft-lbs on medium-duty applications, but always verify your specific figure. Uneven torque warps the flange and causes exhaust leaks.
Step 5: Connect Oil and Coolant Lines
Install a new oil feed line if there’s any sign of internal coking. A restricted feed line starves the bearings. Use a new drain gasket and make sure the drain runs downhill with no kinks, since turbo drains are gravity-fed and cannot be pressurized.
Reconnect coolant lines on water-cooled center housings and check for weeping once the system is refilled.
Step 6: Set Up the Actuator
The wastegate or VGT actuator controls boost, and a misadjusted one throws boost-deviation codes immediately. On variable-geometry units, the vanes must move freely through their full range. You can read more about how these work in this variable-geometry turbocharger reference.
If your actuator is sticking, leaking, or won’t hold calibration, replace it rather than fighting it.
Match the actuator part number to your turbo exactly. The preload and rod length are calibrated per application, so a close-enough substitute will not hold correct boost.
Step 7: Reassemble Intake and Exhaust
Reinstall the charge-air piping, intake ducting, and heat shields with new clamps where the old ones are corroded. A single loose boost clamp will blow off under pressure and dump all your boost. Double-check every connection.
First Startup and Break-In
This procedure protects the bearings you just paid for. Skipping it voids most turbo warranties, including ours.
Disable fuel or crank the engine without starting until you see oil pressure, which confirms the feed line is clear. On mechanical engines, pull the shutoff and crank in short bursts.
Once it fires, let it idle for at least 3 to 5 minutes. Do not rev it, do not load it. This lets oil circulate fully through the new center section. Watch for leaks at the oil, coolant, and exhaust connections during this idle period.
After idling, check for the following before driving:
- No blue or white smoke from the exhaust
- No oil weeping at any fitting
- No exhaust leak whistle at the manifold flange
- Steady oil pressure at idle
Then take it easy for the first 500 miles, avoiding sustained wide-open-throttle. This is also the window to log boost pressure and confirm the actuator is holding target.
Common Installation Mistakes That Kill New Turbos
Every failed-on-arrival turbo we inspect tells the same story. Here are the failures we see most and what causes them.
| Symptom After Install | Likely Cause | Fix |
|---|---|---|
| Blue smoke, oil in intake | Blocked oil drain or over-oiled center | Clear drain, verify no crankcase pressure |
| Immediate bearing failure | No pre-lube or dirty feed line | Prime turbo, replace feed line |
| Compressor wheel damage | Debris left in intercooler or piping | Flush entire charge-air system |
| Low boost, deviation code | Misadjusted or failed actuator | Recalibrate or replace actuator |
| Whistling under load | Loose boost clamp or bad gasket | Re-torque clamps, replace gaskets |
Crankcase pressure deserves special mention.
If the crankcase is over-pressurized from blow-by or a plugged breather, that pressure backs up the oil drain and forces oil past the turbo seals into the intake. You’ll chase an oil-in-the-intake problem that looks like a bad turbo when the real culprit is upstream. Before condemning a fresh unit, check your breather system and run a blow-by test.
The pattern across all of these failures is the same: the turbo rarely fails on its own. It fails because something feeding it, draining it, or calibrating it was overlooked during the install. Get the oil supply clean, the drain clear, the charge-air system spotless, and the actuator matched, and the unit you bolted on will do exactly what it was built to do.
Installing on a newly rebuilt engine? Read why a turbocharger fails on a fresh engine rebuild first.
Frequently Asked Questions
Why do most turbochargers fail prematurely?
Most premature turbo failures come from installation mistakes rather than manufacturing defects. Common errors include skipped oil priming, reused gaskets, debris in the intake, and improperly set actuators.
Do I need to prime a turbocharger with oil before starting the engine?
Yes, oil priming is critical to prevent the bearings from running dry during the first startup. Skipping this step is one of the leading causes of turbo failure within the first minutes of runtime.
Can I reuse gaskets when installing a new turbocharger?
No, you should always use new gaskets during installation. Reused gaskets can cause leaks and improper sealing, leading to performance issues and potential turbo damage.
Need a Turbocharger?
PT Turbo has rebuilt and sold turbochargers since 1978. We stock remanufactured units for Cummins, Duramax, Power Stroke, Detroit Diesel, and more — backed by a 12-month unlimited mileage warranty and same-week shipping from San Bernardino, CA.
📞 (909) 824-1020 · 346 S I St. #3, San Bernardino, CA 92410 · [email protected]